
Introduction
Creating faceless YouTube Shorts with AI has become one of the easiest ways to start a YouTube channel in 2026. With the right tools, you can generate ideas, write scripts, create videos, add AI voiceovers, and publish engaging Shorts without showing your face or recording your own voice. The challenge isn’t finding AI tools—it’s figuring out which ones actually work together. Many tutorials recommend dozens of platforms, but very few show a complete workflow from start to finish. Instead of relying on assumptions, we tested the entire process ourselves to see whether it’s possible to create and publish a YouTube Short using only free AI tools.
In this guide, we’ll walk you through the exact workflow we followed, explain why we chose each tool, highlight the limitations we encountered, and share practical tips to help you create your own AI-generated YouTube Shorts more efficiently. Whether you’re a beginner, a student, or someone looking to start a faceless content channel on a budget, this guide will help you understand what works—and what doesn’t—before you spend hours experimenting on your own.
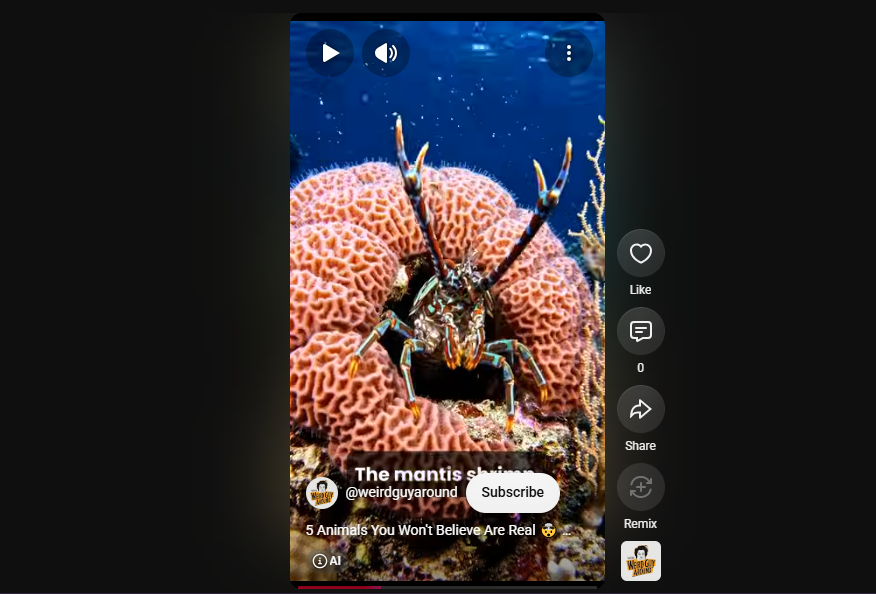
📌 What You’ll Learn
By the end of this guide, you’ll know how to:
- Choose engaging YouTube Shorts ideas using AI
- Fact-check your content before creating videos
- Generate AI video clips without spending money
- Add AI voiceovers and automatic captions
- Publish a complete faceless YouTube Short using free tools
- Avoid common mistakes that can slow down your workflow
Can You Create Faceless YouTube Shorts with AI for Free?
Yes. You can create faceless YouTube Shorts using free AI tools without showing your face or recording your own voice. During our testing, we combined multiple AI tools to handle brainstorming, fact-checking, video generation, editing, AI voiceovers, captions, and publishing.
The entire workflow was completed without spending any money, proving that beginners can start an AI-powered YouTube Shorts channel using free plans. However, each tool has its own limitations, so combining the right tools produces better results than relying on a single platform.
AI Tools We Used
| Task | Tool | Purpose |
|---|---|---|
| 💡 Idea Generation | ChatGPT | Brainstorming video ideas and writing the script |
| 🔍 Fact Verification | Perplexity AI | Verifying facts with cited sources |
| 🎬 AI Video Generation | Google Flow (Veo) & Google Vids (Veo) | Creating AI-generated video clips |
| ✂️ Video Editing | CapCut | Trimming clips and adjusting playback speed |
| 🎙️ Voiceover & Captions | Google Vids | AI narration, subtitles, music, and final export |
| 📺 Publishing | YouTube Studio | Uploading the completed Short |
💰 Total Cost: $0
⏱️ Total Time: ~1 Hour
🎯 Difficulty: Beginner
Free AI tools are now powerful enough to create high-quality YouTube Shorts. The biggest difference comes from choosing the right workflow, writing better prompts, and verifying your content before generating videos.
The AI Workflow We Used
Rather than relying on a single AI tool, we used a simple workflow where each tool handled one specific task. This approach gave us better results than trying to complete everything inside a single platform, while also making the most of each tool’s free plan.
If you’re creating your first AI-generated YouTube Short, don’t worry about mastering every tool. Just follow the workflow below, and we’ll explain each step in detail throughout this guide.
💡 Generate an Idea ↓ 🔍 Verify the Facts ↓ 📝 Write the Script ↓ 🎬 Generate AI Videos ↓ ✂️ Trim & Edit Clips ↓ 🎙️ Add Voiceover & Captions ↓ 📺 Publish to YouTube
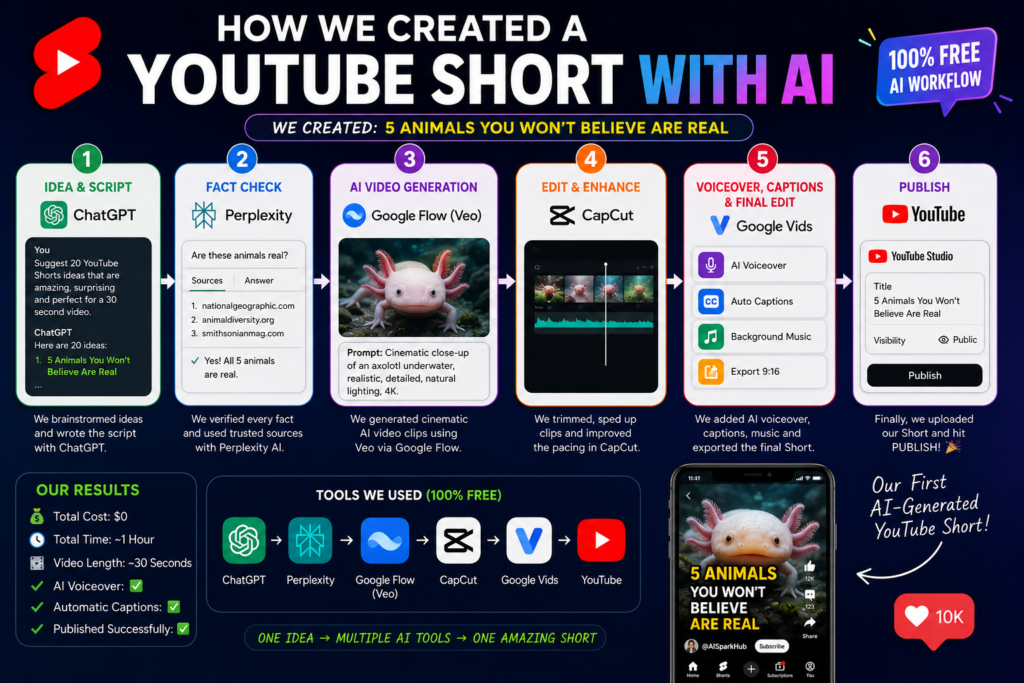
In the following sections, we’ll walk through each stage, explain why we chose each tool, share the prompts that worked best, and point out the limitations we encountered along the way.
Step 1 – Brainstorm Your YouTube Shorts Idea with ChatGPT
Every successful YouTube Short starts with a strong idea. Before thinking about video generation or editing, you need a topic that can grab attention within the first few seconds and keep viewers watching until the end. For our project, we used ChatGPT as our brainstorming partner. Instead of searching through dozens of websites or scrolling endlessly for inspiration, we asked ChatGPT to generate ideas that would work well in a 30-second faceless YouTube Short. One thing we quickly noticed was that the quality of ChatGPT’s responses depends heavily on the quality of your prompt. Generic prompts often produce generic ideas, while detailed prompts lead to much more focused and usable results.
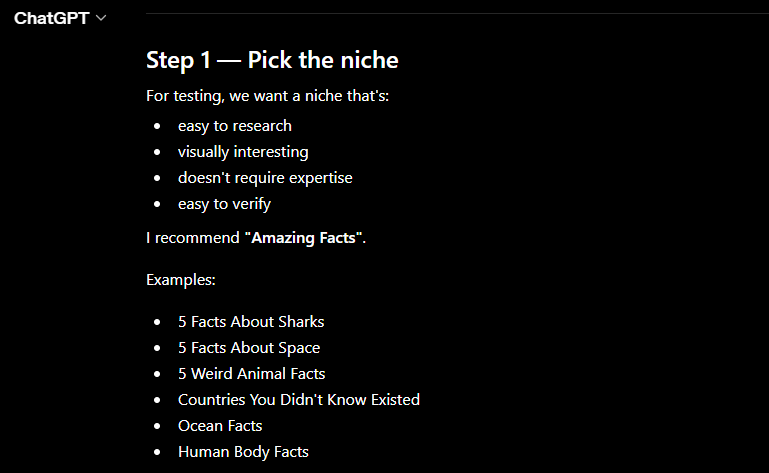
For example, instead of asking:
“Give me YouTube Shorts ideas.”
A much better prompt would be:
Suggest 20 YouTube Shorts ideas that: – Can be explained in under 30 seconds – Have a strong curiosity hook – Are fact-based – Can be visualized using AI-generated videos – Appeal to a general audience
The difference in output was significant. ChatGPT generated ideas that were far more suitable for AI video generation and Shorts-style storytelling.
⚠️ One Important Limitation We Discovered
While ChatGPT is excellent for brainstorming, it rarely challenges your assumptions. During our testing, we initially decided to create a Short about animals that can survive without their heads. ChatGPT helped us expand the idea and even suggested additional examples, but it didn’t point out that some of those claims were scientifically nuanced or potentially misleading. That isn’t necessarily a flaw—ChatGPT’s role was to help us brainstorm—but it reminded us that AI-generated ideas should always be verified before turning them into content.
This is exactly why our next step was fact-checking every claim before writing the final script.
Our Tip: Use ChatGPT for creativity, not as your only source of truth.
If you’re new to ChatGPT, read our complete ChatGPT review to explore its features, pricing, strengths, and practical use cases before using it for content creation.
Once we had a promising idea, the next question was simple: Were the facts actually correct? Before generating any videos, we verified every claim using Perplexity AI to make sure our content was accurate and trustworthy.
Step 2 – Verify Your Content Before Creating Videos
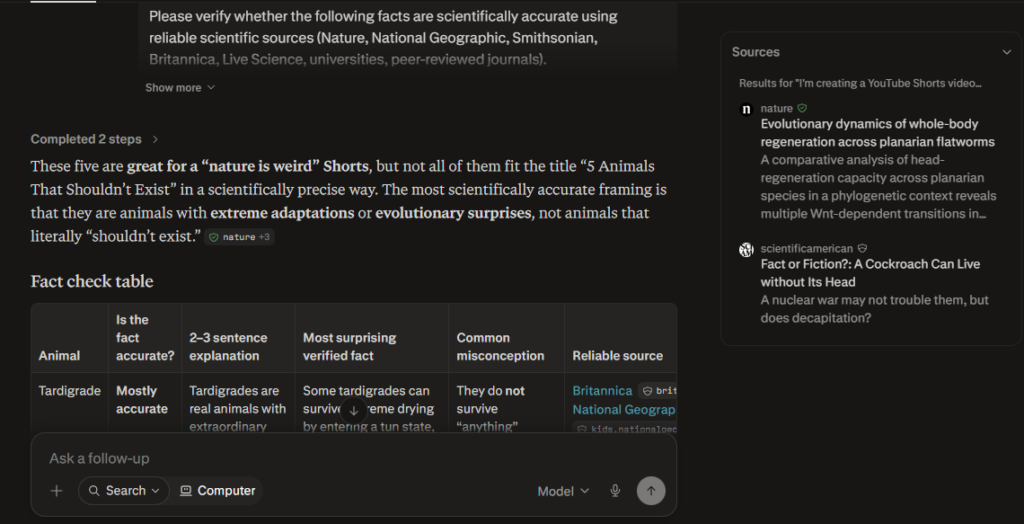
One of the biggest mistakes new creators make is assuming that an AI-generated answer is automatically accurate. While ChatGPT helped us brainstorm ideas and structure the video, we didn’t want to rely on it as our only source of information. Instead, we used Perplexity AI to verify every fact before moving on to video generation.
This step turned out to be one of the most important parts of our workflow.
Our original video idea was based on animals that can survive without their heads. At first glance, it seemed like a great topic for a YouTube Short. However, after researching the claims with Perplexity, we realized that several examples required much more scientific context than could fit into a 30-second video. Rather than publishing something that could be misleading, we scrapped the idea completely and started over.
That decision probably saved us from publishing inaccurate content.
Why We Chose Perplexity
Unlike traditional AI chatbots, Perplexity provides answers backed by cited sources, making it much easier to verify information without opening dozens of browser tabs.
Instead of simply asking:
“Is this fact true?”
We could quickly compare multiple sources, read supporting references, and decide whether a topic was suitable for a short-form video. For content creators, that extra layer of verification is incredibly valuable—especially when you’re publishing educational or fact-based content.
💡 What We Learned
The best AI workflow isn’t ChatGPT or Perplexity—it’s ChatGPT and Perplexity.
We found that ChatGPT was excellent for generating ideas and writing drafts, while Perplexity was better suited for verifying facts before those ideas became published content. Using both tools together helped us work faster without sacrificing accuracy.
Want to learn more about its research capabilities? Read our complete Perplexity AI review, where we cover its features, pricing, strengths, and how it compares with traditional search engines.
Once we were confident that every fact was accurate, it was time to turn our script into visuals. In the next step, we’ll show you how we generated cinematic AI video clips using Google’s Veo models—and why our original plan changed halfway through the project.
Step 3 – Generate AI Videos Using Google’s Veo Models
With our script finalized and every fact verified, it was finally time to create the visuals.
For this project, we relied on Google’s Veo models, using both Google Flow and Google Vids during different stages of the workflow. Our original plan was to generate every scene inside Google Flow, but while testing, Google updated its free plan and increased the credit cost for certain generations. Rather than exhausting our available credits, we adjusted our workflow and generated most of our clips directly inside Google Vids, which also provides access to Veo-powered video generation.
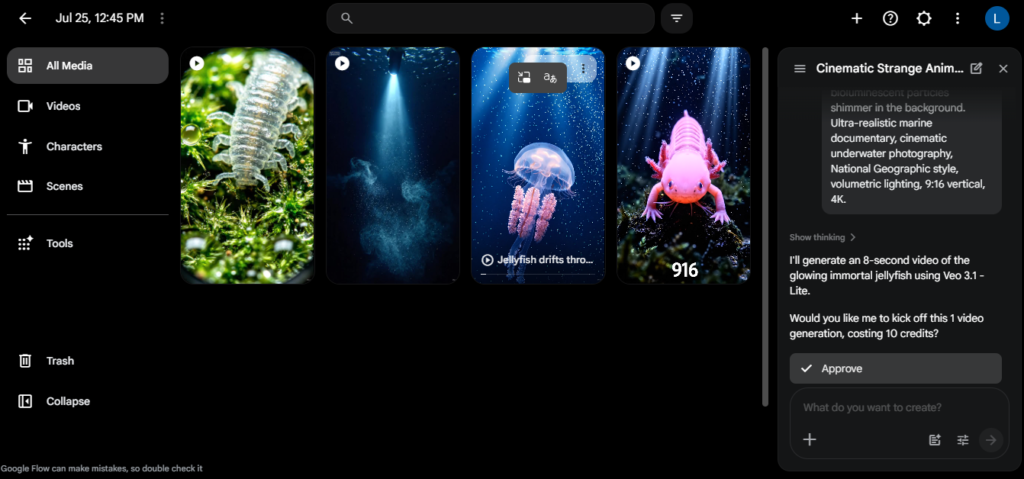
This turned out to be a practical reminder that AI tools evolve quickly. Free plans, generation limits, and credit systems can change, so it’s worth checking the latest limits before starting a large project.
To keep the workflow efficient, we wrote one prompt for each scene instead of trying to generate the entire Short in a single request. Breaking the project into smaller clips gave us much better control over the pacing and made it easier to regenerate individual scenes whenever something didn’t look right.
For example, instead of writing:
“Create a 30-second video about five strange animals.”
We generated each scene separately with prompts tailored to the specific subject, camera angle, lighting, and movement. This approach produced more consistent results and made editing much easier later.
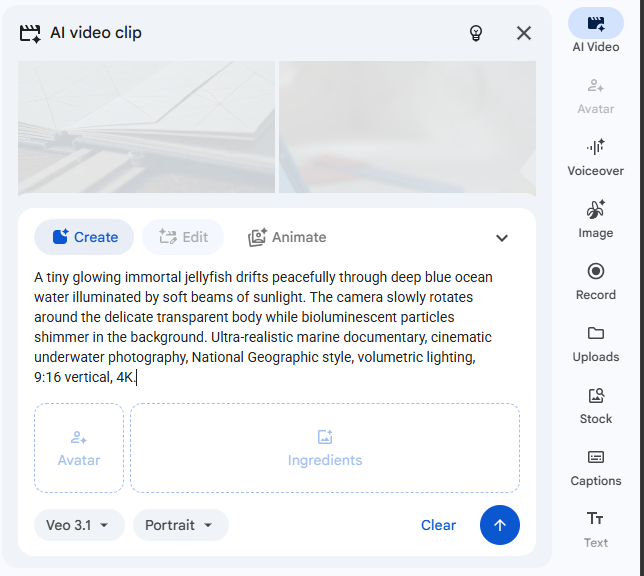
One thing we genuinely liked about Veo was its visual quality. Even on the free plan, the generated clips looked surprisingly cinematic and required very little manual correction. Most clips were ready in about a minute, making it easy to iterate without slowing down the project.
However, we also noticed that the generated clips were generally longer than what a YouTube Short actually needs. Since our final video was only around 30 seconds, several scenes had to be trimmed or slightly sped up during editing to maintain a fast pace. We also noticed a small Veo watermark on the generated videos, although it wasn’t particularly distracting once the clips were shortened for a Short.
If you’re interested in Veo’s features, pricing, generation quality, and current free-plan limits, check out our complete Google Flow review, where we explore the platform in much greater detail.
Once all of our scenes were generated, the next challenge was turning them into a polished YouTube Short. That meant trimming unnecessary footage, adjusting the pacing, and adding voiceovers, captions, and background music. That’s where the editing process began.
Step 4 – Edit Your AI Short and Add Voiceovers
Once all of our AI video clips were ready, the next step was turning them into a polished YouTube Short. Rather than trying to do everything inside a single editor, we split the editing process between CapCut and Google Vids, using each tool for the tasks it handled best.
We started in CapCut, where we trimmed unnecessary footage, sped up a few scenes, and adjusted the pacing. This step was important because the Veo-generated clips were often longer than we needed for a 30-second Short. Shortening a few scenes helped maintain a faster rhythm and kept the video engaging from start to finish.
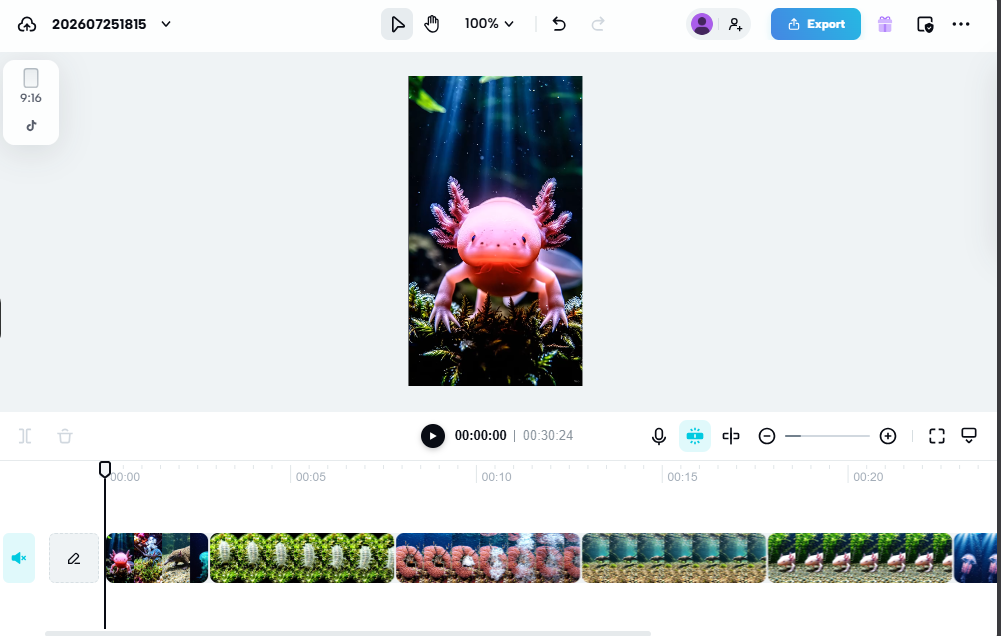
After exporting the edited clips, we moved everything into Google Vids for the final production. This is where the project really came together.
Using Google Vids, we added an AI voiceover, generated automatic captions, included background music, and exported the finished video. We were genuinely surprised by how much the platform could handle. Before starting the project, we expected to complete the final edit in CapCut, but Google Vids ended up taking care of most of the finishing touches.
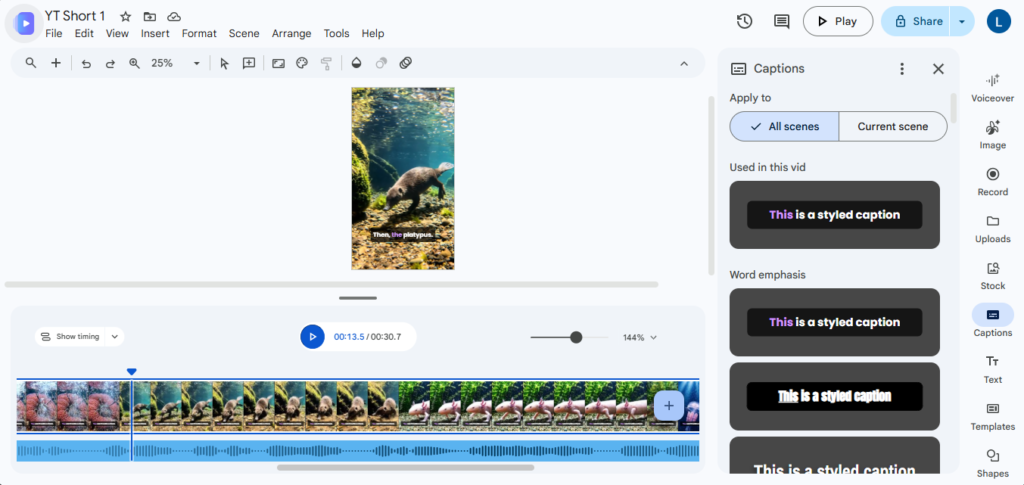
One thing worth mentioning is the AI voice quality. We initially explored using CapCut for voiceovers, but many of its better AI voices required a paid subscription. Google Vids offered more natural-sounding voices in our testing, so we chose it for the narration instead.
Although Google Vids made the editing process straightforward, it does have limitations on its free plan. During our testing, we discovered that video generation is limited, so it’s worth planning your scenes carefully before clicking Generate. Creating a simple script and storyboard first can help you avoid wasting valuable generations.
Our biggest takeaway: Don’t feel like you have to edit everything in one application. We found that using CapCut for quick clip adjustments and Google Vids for voiceovers, captions, and final export gave us the smoothest workflow while staying completely free.
If you’d like to explore its features in more detail, read our complete Google Vids review, where we cover its AI editing tools, free plan, limitations, and overall performance.
With the editing complete, there was only one step left—uploading the finished Short to YouTube and seeing whether our AI-powered workflow had successfully produced a publishable video.
Step 5 – Publish Your YouTube Short
After reviewing the final edit, we exported the video from Google Vids and uploaded it directly to YouTube Studio. Compared to everything that came before it, this was the simplest step in the entire workflow.
When publishing a Short, we spent a few extra minutes optimizing the basic details instead of rushing the upload. A clear title, a concise description, and relevant hashtags help YouTube understand what your content is about and improve its chances of reaching the right audience.
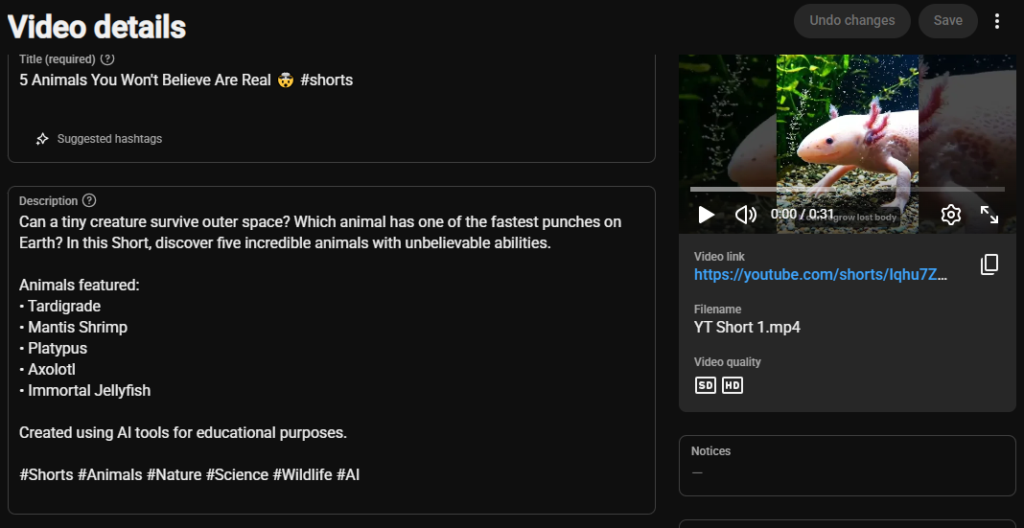
For our first AI-generated Short, we also made sure that the video was exported in the correct vertical format (9:16) and that the captions were easy to read on mobile devices. Since most Shorts are watched on phones, small details like caption placement and pacing can make a noticeable difference to the viewing experience.
With everything in place, we hit Publish.
Seeing a YouTube Short that had been planned, scripted, generated, edited, and narrated using free AI tools was genuinely satisfying. More importantly, it proved that creating a faceless YouTube Short with AI isn’t just a theory—it can be done with tools that anyone can access.
📊 Our Final Results
Here’s how the project turned out.
| Metric | Result |
|---|---|
| Total Cost | $0 |
| Total Time | ~1 Hour |
| Video Length | ~30 Seconds |
| AI Voiceover | ✅ |
| Automatic Captions | ✅ |
| Published Successfully | ✅ |
While this was only our first test, it successfully validated the workflow from beginning to end. We now had a complete AI-assisted YouTube Short published online without paying for premium AI tools.
Don’t wait for perfection before publishing. Your first few Shorts are learning opportunities. Publishing consistently and improving with each video is far more valuable than spending days trying to perfect a single upload.
Creating the Short was only half the experiment. The next question was whether this workflow was actually practical for beginners. So, before wrapping up, let’s break down how long each step took, the limitations we encountered, and the biggest lessons we learned from the entire process.
What We Learned After Creating Our First AI YouTube Short
Creating our first faceless YouTube Short with AI taught us much more than simply learning how to use a few tools. More importantly, it showed us where AI performs exceptionally well, where human input is still essential, and how combining multiple tools creates a much smoother workflow than relying on a single platform.
One of our biggest takeaways was that better prompts consistently produced better results. Whether we were brainstorming ideas with ChatGPT or generating videos with Veo, providing detailed instructions made a noticeable difference. Spending an extra minute writing a clear prompt often saved several minutes of editing later.
We also learned that AI should never replace fact-checking. Our original concept seemed perfectly fine until we verified it using Perplexity. That extra research completely changed the direction of our video and helped us avoid publishing content that could have been misleading. For educational or fact-based Shorts, verification is a step we wouldn’t skip again.
Another surprise was how flexible the workflow became once we stopped expecting one tool to do everything. Instead of forcing Google Flow, CapCut, or Google Vids to handle every task, we used each platform for what it did best. That approach not only improved the final video but also made it easier to work around free-plan limitations when they appeared.
Perhaps the biggest surprise was realizing that an entire AI-assisted YouTube Short can genuinely be created without spending any money. Free plans do have restrictions, and you’ll occasionally need to adjust your workflow as platforms change their limits, but the overall process is much more accessible than we expected.
If We Made This Short Again…
Looking back, there are a few things we’d improve before creating the next one.
- We’d spend more time crafting a stronger hook for the first three seconds.
- We’d add countdown numbers or visual progress indicators to improve viewer retention.
- We’d include more sound effects and transitions to make scene changes feel more dynamic.
- We’d plan our video generations more carefully to avoid wasting free credits.
None of these changes require paid tools—they simply come from experience.
And that’s probably the biggest lesson from this project:
Frequently Asked Questions
Can you create YouTube Shorts entirely with AI?
Yes, but not completely on autopilot. AI can help you generate ideas, write scripts, create videos, produce voiceovers, and add captions. However, you’ll still need to review the output, verify facts, refine prompts, and make editing decisions to create a polished Short.
What are the best free AI tools for faceless YouTube Shorts?
Based on our testing, here’s the workflow we recommend:
ChatGPT for brainstorming ideas and writing scripts
Perplexity AI for fact-checking and research
Google Flow (Veo) or Google Vids (Veo) for AI video generation
CapCut for trimming and speeding up clips
Google Vids for AI voiceovers, captions, background music, and final export
Each tool handles a different part of the process, making the overall workflow more reliable than relying on a single platform.
Is Google Vids free?
Yes. Google Vids offers a free plan, but it includes usage limits that may change over time. During our testing, we discovered a limit on AI video generations, so it’s worth checking the latest free-plan details before starting a larger project.
Is Google Flow free?
Google Flow also provides free access to Veo-powered video generation, but it uses a credit-based system. While we were creating this project, Google updated the credit requirements for some generations, which influenced our workflow. Because these limits can change, we recommend checking your available credits before generating multiple scenes.
How long does it take to create an AI YouTube Short?
In our experience, creating a complete AI-generated YouTube Short took about one hour.
Idea & Research – 20 minutes, Prompt Writing – 5 minutes, Video Generation – 7 minutes, Editing – 20 minutes, Uploading – 5 minutes
The exact time will vary depending on how many scenes you regenerate and how much editing you do.
Can I monetize AI-generated YouTube Shorts?
Yes, AI-generated Shorts can be monetized as long as they comply with YouTube’s monetization policies and provide original value to viewers. Simply generating videos with AI isn’t enough—you should add meaningful creative input through your topic selection, scripting, editing, narration, or overall presentation.
Final Thoughts
Creating a faceless YouTube Short with AI is no longer something limited to experienced creators or expensive software. As our project showed, it’s entirely possible to go from a simple idea to a published YouTube Short using free AI tools and a well-planned workflow.
That doesn’t mean AI does everything for you.
The biggest lesson we learned was that AI performs best when each tool is used for the task it’s designed to do. ChatGPT helped us brainstorm ideas, Perplexity ensured our information was accurate, Google’s Veo models generated the visuals, CapCut refined the pacing, and Google Vids brought everything together with AI voiceovers, captions, and the final export.
Just as importantly, we learned that creating good AI content still requires human judgment. Better prompts produced better videos, fact-checking prevented mistakes, and small editing decisions made a noticeable difference to the final result.
If you’re thinking about starting a faceless YouTube channel, don’t wait until you’ve found the “perfect” AI tool. The tools will continue to improve, free plans will change, and new features will be released. What matters most is gaining experience by creating and publishing your first video.
After all, that’s exactly how this guide came to life.
We didn’t just research these tools—we used them to create and publish a real AI-assisted YouTube Short. We made mistakes, adjusted our workflow, learned from the process, and shared those lessons here so you can start with a clearer roadmap.
Now it’s your turn.
Open your favorite AI tool, generate your first idea, and publish your first Short. Every creator starts with a single upload—and the sooner you begin, the faster you’ll discover what works for your own style.
Continue Exploring AI Tools
If you found this guide helpful, you might also enjoy:
👉 Best Free AI Tools in 2026
👉 Best AI Assistants in 2026
👉 Best Free Video Generators
👉 Best Free Image Generators